5 Steps To Make Your MacBook Battery Last Longer
Kia ora, MacBook users! Praveen here from SMASHED IT. After fixing thousands of MacBooks across Auckland—from Ponsonby cafés to Parnell offices—I’ve seen every battery issue imaginable. Let me share the insider tricks that actually work.
Why Your MacBook Battery is Draining Faster Than a Kiwi Summer
Before we dive into solutions, let’s talk straight: your MacBook battery isn’t immortal. Whether you’re a Ponsonby creative burning through Photoshop sessions or a central Auckland tradie using your MacBook Pro for site documentation, understanding how batteries work is crucial for maximizing their life.
Every MacBook uses lithium-ion polymer batteries designed for around 1,000 charge cycles. Here’s the kicker though—it’s not just about time passing.
Your battery’s “chemical age” depends on temperature history and charging patterns. This is why some MacBooks I see in my Parnell workshop still have excellent battery life after three years, while others are struggling after eighteen months.
Table of Contents
Step 1: Check Your Battery Health
Before we start tweaking settings, let’s establish a baseline. You can’t fix what you don’t measure, and I’ve seen too many Auckland users panic over perfectly healthy batteries—or ignore genuinely failing ones.
How to Check Your MacBook Battery Health
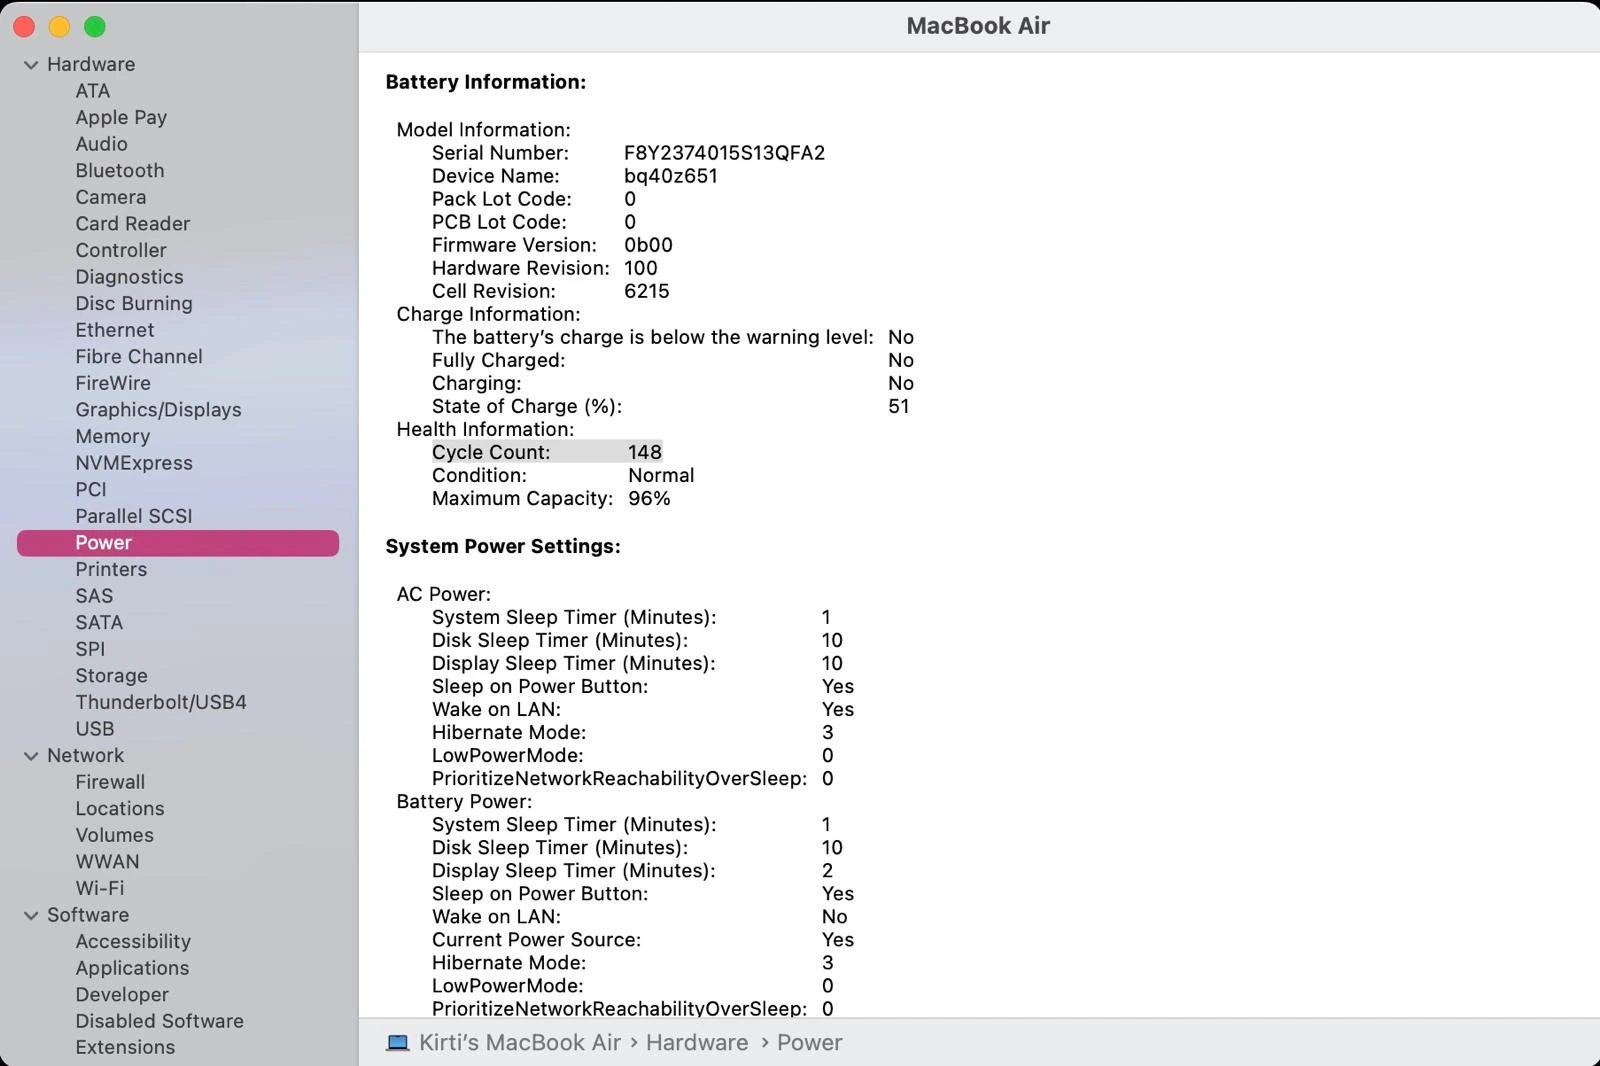
First things first—let’s see what we’re working with. Here’s how to check your battery condition like a pro:
- Quick Check: Hold the Option key and click the Apple menu, then select “System Information“
- Navigate to Hardware > Power
- Look for your cycle count and condition
What the Numbers Mean:
- Normal: Your battery is functioning as expected
- Service Recommended: Capacity has diminished, but you can usually keep using it safely
- Cycle Count: Compare this to the 1,000-cycle limit for MacBooks
Understanding MacBook Battery Cycle Limits
| MacBook Model | Maximum Cycle Count |
|---|---|
| MacBook Air | 1,000 cycles |
| MacBook Pro | 1,000 cycles |
| MacBook (discontinued) | 1,000 cycles |
Step 2: Optimize macOS Settings for Maximum Battery Life
Now that you know your battery’s current state, let’s unlock the built-in features that Apple provides—most users never touch these settings, but they’re absolute game-changers.
Enable Optimized Battery Charging (The Smart Move)
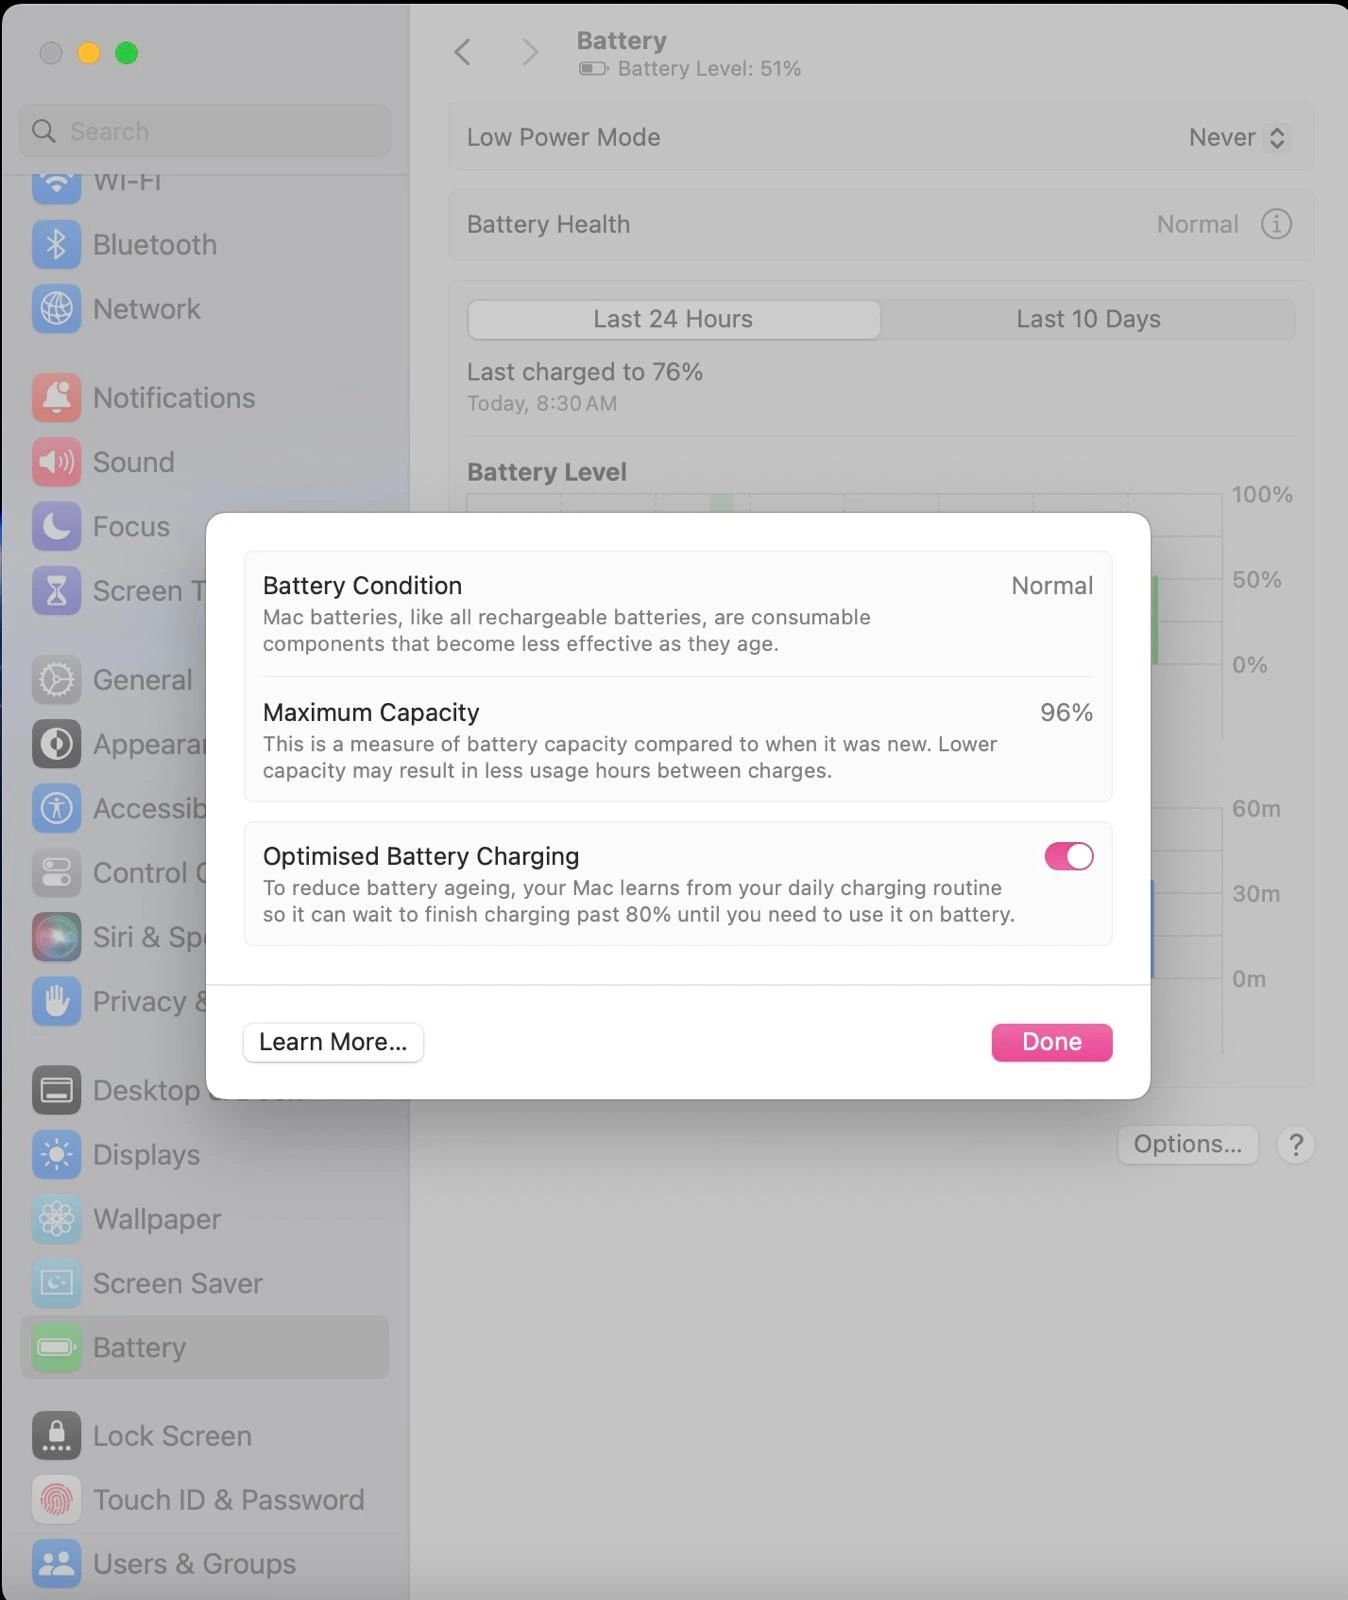
This is the most underrated feature for extending battery life. Optimized Battery Charging learns your daily routine and delays charging past 80% until you need it. Perfect for those long coding sessions in Ponsonby or all-day meetings in the CBD.
How to enable it:
- Go to Apple menu > System Settings > Battery
- Click the “i” button next to Battery Health
- Toggle on “Optimized Battery Charging”
This feature essentially automates the “20-80 rule” without you having to babysit your charger—brilliant engineering, really.
Activate Low Power Mode (Your Emergency Battery Extender)
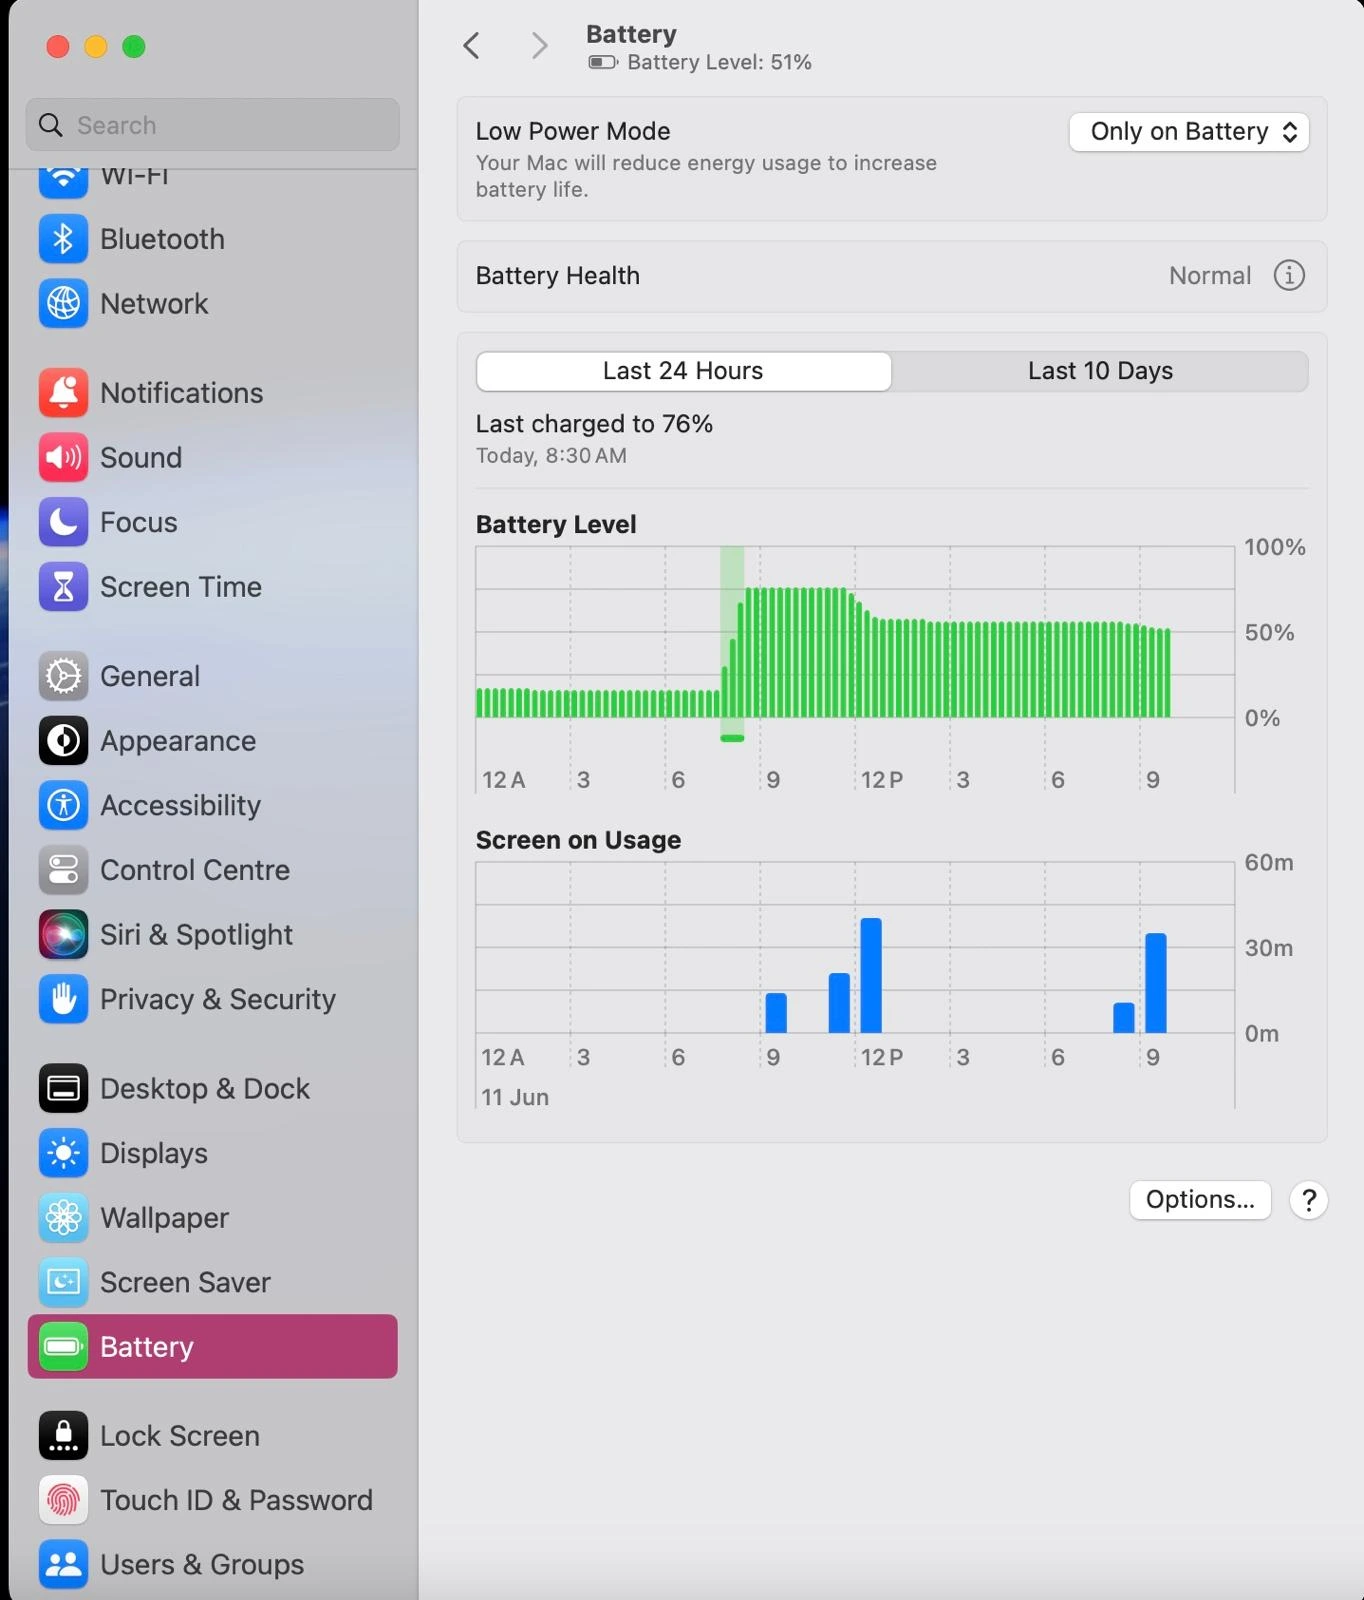
When you’re stuck in a Queen Street meeting with 20% battery and no charger in sight, Low Power Mode is your best mate. It reduces display brightness, limits background activities, and can extend your battery life significantly.
To activate:
- Apple menu > System Settings > Battery
- Select “Only on Battery” from the Low Power Mode dropdown
Real talk: I recommend keeping this on “Only on Battery” for most Auckland professionals. You’ll barely notice the performance difference, but your battery will thank you.
Fine-Tune Display and Connectivity
Brightness Control: Your display is the biggest power hog. Keep it as dim as comfortable—especially important for those sunny Auckland afternoon café sessions where you might be tempted to crank it up.
Disable Unnecessary Connectivity:
- Turn off Wi-Fi when using ethernet
- Disable Bluetooth when not connecting peripherals
- Both continue drawing power even when not actively connected
Step 3: Advanced Optimization Techniques
Ready to dig deeper? These next steps require a bit more technical know-how, but they’re where the real battery life improvements happen—especially for power users running multiple apps.
Identify Battery-Draining Apps with Activity Monitor
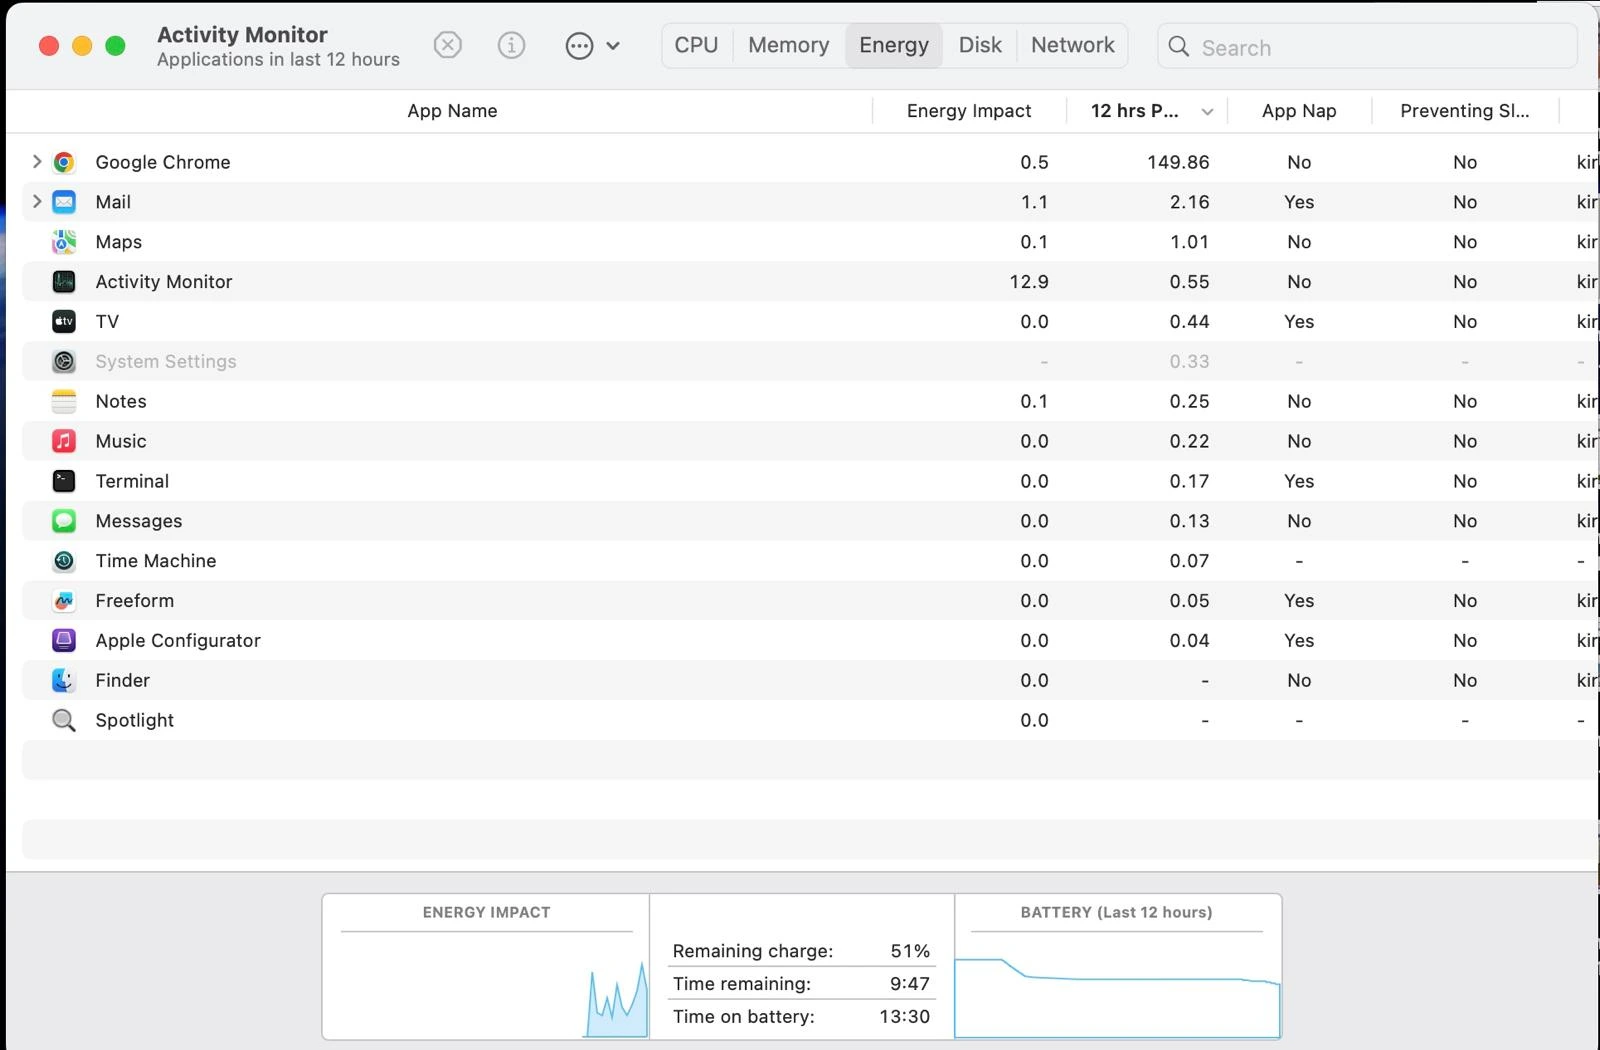
Open Activity Monitor (Applications > Utilities) and click the “Energy” tab. This shows you which apps are being energy hogs. Common culprits I see in my workshop include:
- Adobe Creative Suite (especially that sneaky Core Sync process)
- Chrome with too many tabs (Switch to Safari for better battery life)
- Video conferencing apps left running in background
- File syncing services (Dropbox, Google Drive, OneDrive)
Pro tip: The “Preventing Sleep” column shows apps keeping your Mac awake—these are often the worst offenders for overnight battery drain.
Manage Login Items and Background Processes
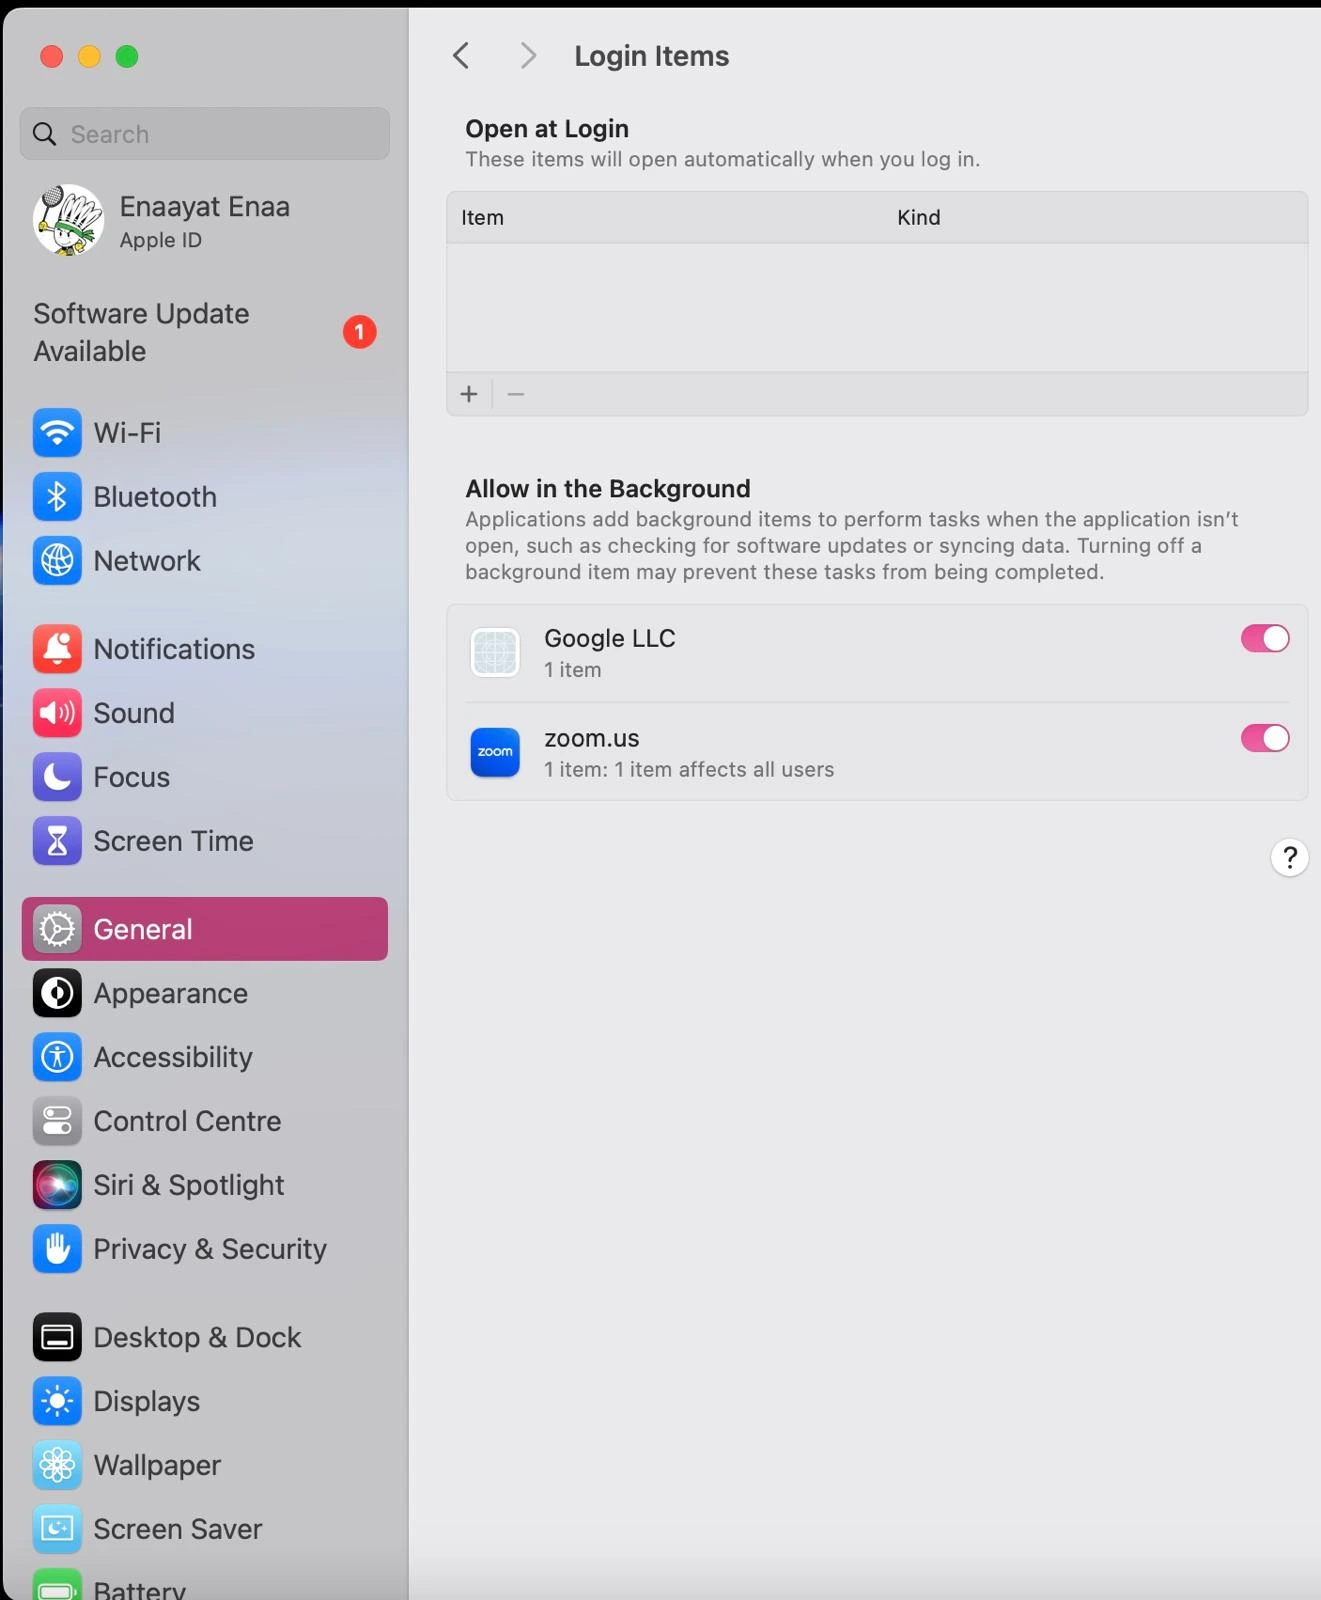
Too many apps launching at startup can kill your battery before you even start working. Clean up your login items:
- System Settings > General > Login Items
- Remove unnecessary apps from the list
- Check the “Allow in the Background” section and disable apps you don’t need running constantly
Fix MacBook Battery Drain After Shutdown
Nothing’s more frustrating than shutting down your MacBook at 70% and finding it at 20% the next morning. Here’s what’s usually happening:
Disable Power Nap:
- System Settings > Battery > Options
- Deselect “Enable Power Nap”
Power Nap lets your Mac update emails and sync data while “sleeping”—convenient, but it’s not really sleeping, is it?
Other Sleep Drain Fixes:
- Disconnect USB devices that draw power
- Close apps that prevent proper sleep (check Activity Monitor)
- Turn off Wi-Fi and Bluetooth before closing the lid
Step 4: Smart Charging Habits for Long-Term Battery Health
Here’s where I debunk some myths and share what actually matters for long-term battery health. Good charging habits can add years to your MacBook’s life—bad ones can kill a battery in months.
The Truth About Keeping Your MacBook Plugged In
Here’s something that surprises many of my customers: it’s generally fine to keep your MacBook plugged in. Modern MacBooks have sophisticated battery management that prevents overcharging. The system bypasses power directly to the laptop once fully charged.
However, occasionally letting your battery discharge to around 20-40% can be beneficial. Think of it as giving your battery a bit of exercise.
Temperature Matters More Than You Think
Auckland’s climate is generally battery-friendly, but summer heat can be brutal on batteries. Keep your MacBook:
- Between 16-22°C when possible
- Away from direct sunlight (especially in cars)
- Well-ventilated during charging
I’ve seen too many MacBooks come into my Papakura workshop with heat-damaged batteries from being left in hot cars or used on beds/couches where ventilation is poor.
What About the “20-80 Rule”?
You might have heard about keeping your battery between 20-80% charge. While there’s science behind this, constantly unplugging and replugging can actually increase your charge cycles.
Apple’s Optimized Battery Charging handles this automatically, so don’t stress about micromanaging your charging routine.
Step 5: Troubleshooting Common Battery Issues
When optimization isn’t enough, it’s time to troubleshoot. These are the most common battery problems I see in my workshops—and the solutions that actually work.
MacBook Battery Draining Fast After macOS Update
This is incredibly common. After major updates, your Mac might be re-indexing files, updating apps, or running background maintenance.
Give it 2-3 days to settle down. If the problem persists, check Activity Monitor for apps behaving badly.
MacBook Doesn’t Hold Charge or Won’t Charge
If your MacBook battery doesn’t charge at all or drops from 100% to dead very quickly, this usually indicates a failing battery that needs replacement. Don’t try to “fix” this with software solutions—it’s hardware time.
Setting Battery Charge Limits
While macOS handles most optimization automatically, third-party apps like AlDente can set specific charge limits if you want more control. However, for most users, Apple’s built-in management is sufficient.
When It’s Time for Professional Help
Sometimes, despite all optimization efforts, your MacBook battery life is still poor. Here are signs it’s time for a professional assessment:
- Cycle count approaching 1,000
- Battery drains from 100% to 0% in under 2 hours with normal use
- “Service Recommended” status with noticeably poor performance
- Physical swelling of the battery (stop using immediately!)
- Won’t charge past a certain percentage
Why Choose SMASHED IT for Your MacBook Battery Replacement
At SMASHED IT, we’ve been Auckland’s trusted MacBook repair specialists for years. Our warranty-backed repairs use genuine Apple parts, and our technicians understand the unique needs of Kiwi MacBook users—from the creative professionals in Ponsonby to the business users in Parnell.
Our locations:
- Parnell: Premium service for CBD professionals
- Papakura: Convenient South Auckland location
- Ponsonby: Perfect for creatives and café workers
We offer free battery health assessments and can often have your MacBook running like new within 24 hours.
Download MacBook Battery Action Plan
Here’s your checklist to maximize MacBook battery life:
Ready to Extend Your MacBook’s Life?
Following these tips should significantly improve your MacBook battery life. Remember, batteries are consumable components—even with perfect care, they’ll eventually need replacement. The key is maximizing their lifespan and knowing when it’s time for professional service.
If you’re still experiencing poor battery life after trying these solutions, or if you’re seeing any of the red flags mentioned above, don’t wait until your MacBook dies completely. Book a free assessment at any of our SMASHED IT locations in Parnell, Papakura, or Ponsonby.
Contact SMASHED IT today:
- Expert diagnostics and genuine Apple parts
- Warranty-backed repairs
- Same-day service available
- Trusted by thousands of Auckland MacBook users
Your MacBook battery doesn’t have to be a source of stress. With the right care and professional support when needed, you can keep your device running smoothly for years to come.
